You can track forms on your website easily, reduce the number of tags on your code, implement Google Analytics enhanced eCommerce tracking, implement Facebook catalog, and much more. Learn what a data layer is and how to use it without learning complex website development skills.
For the record: I will use some simplifications within this article. The goal is to describe the data layer and its practical usage for digital marketers so it won’t be 100% exhaustive. If, after reading this you’ll want to know more – I will share some additional sources at the end of the article.
What is the data layer?
Here are a few definitions I found:
A data layer is a specification of the vast amounts of customer interaction data that flow from your digital properties.
Or
A data layer is a JavaScript object, which in some cases will also be referred to as a Universal Data Object (UDO) where you can store, process, and pass data.
If you don’t understand it – don’t worry. Me neither. Let’s try something else.
As you may know, a basic website contains a structure and content written in HTML and a stylesheet written in CSS. You can also style your content within an HTML page but it’s usually much easier to separate a style layer in a distinct CSS file.
In a similar way, we can separate the data layer from the rest of your website. We do it to have all the information we will send further from the website in one place. And by “sending further” I mean sending to our tag manager.
Why do we need a data layer?
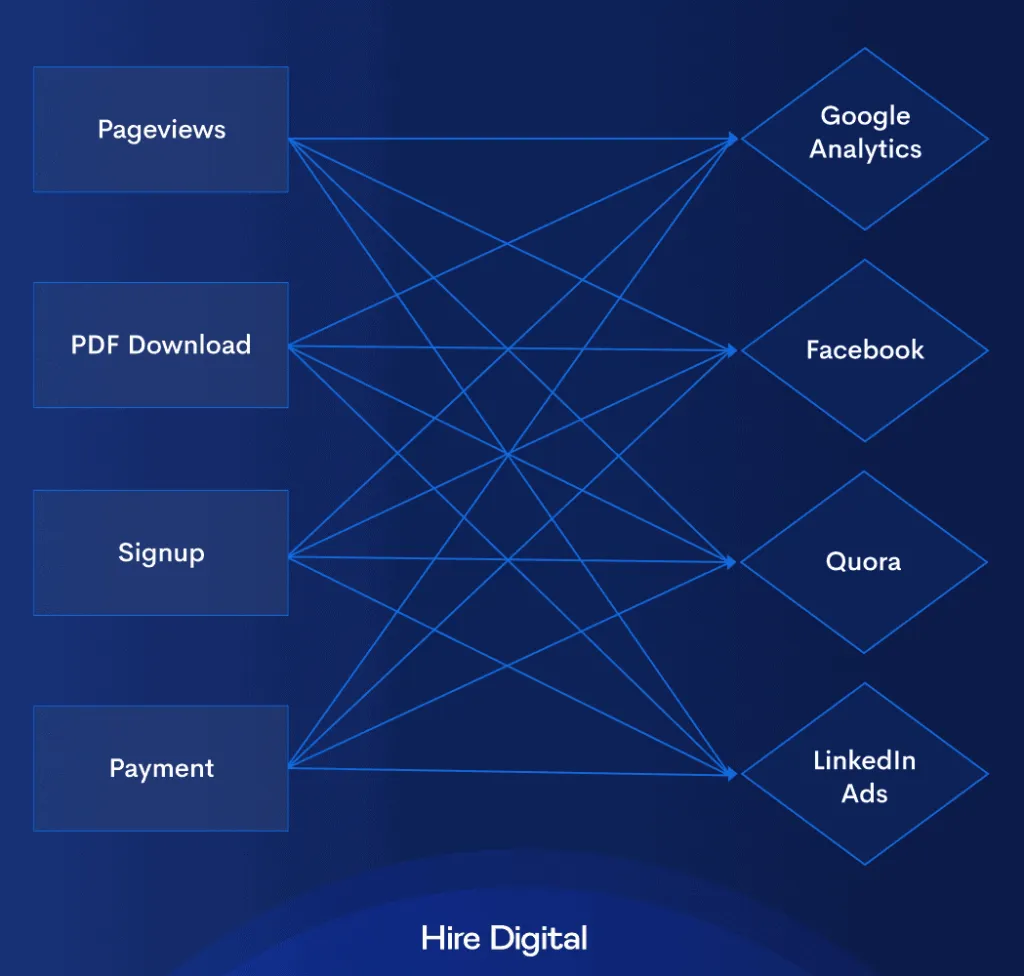
If you use many marketing and analytics systems like Google Ads, Google Analytics, Facebook, LinkedIn, Twitter, Adroll, Quora, Hotjar, etc. you need to add every tracking code to every part of your website you want to track. All pages, buttons, forms, checkouts, payments process steps, etc. Like here:
Luckily a data layer works as a middle man. Instead of implementing all of these tools separately, you can send the info from the website to the data layer and from the data layer to every tool you want which highly reduces the number of steps you need to make and a level of complexity. Also – you won’t need a developer’s help every time you want to try a new marketing channel.
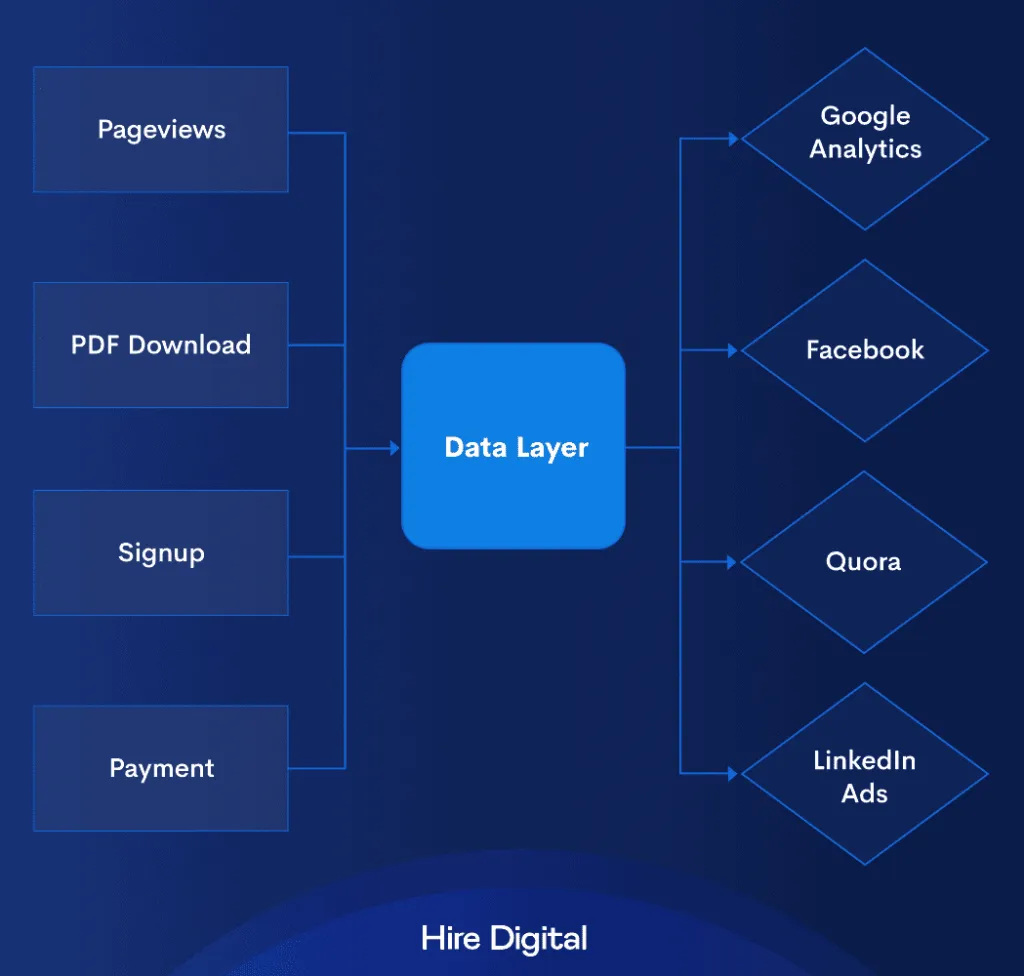
You can think of the data layer as a middle man, a translator, or a universal connector that works with every other plug.
What can you do with the data layer?
As we already know, a data layer can help us to reduce the number of changes in the website whenever we want to implement a new tracking code. What else can we send there?
Product data
Perfect solution, if you want to implement a Google Analytics, enhanced eCommerce, or Facebook product catalog and then, for example, create a dynamic remarketing campaign based on these data. You need to let these tools know about what products have been viewed, what is their price, category, name, etc. All of this information you can put in the data layer.
Customer data
You can recognize a new or returning customer or send the user_id or account_id for a registered user into the data layer. You can use some of them as Google Analytics custom variable and for example, create a dynamic landing page with personalized content for every user or user type.
Transaction data
You can store the information about cart value, products in carts, transaction values, etc. For example, if you want to create a segment of high-value users and create a special offer for them via a display campaign or on your website.
This is not the complete list of data types and uses cases. Such a list doesn’t exist because the possibilities are endless and different for every type of business so instead of counting them let’s go through the most popular cases step by step.
How to implement events and conversions with a data layer?
Let’s say you want to track a signup form or a newsletter form in Google Analytics and Facebook Ads. By the way if you’d like to read more about reporting using Google Analytics and Google Data Studio – this article might be helpful. Ok, so to track a signup form we need some kind of trigger.
There’s no thank-you page after the form is finished so we can’t use a simple “URL” filter to fire our scripts.
We can track the button clicks or the form submission depends on how our page is built.
That’s where event tracking and data layer will be the most useful. We’re going to need:
a) Tracking conversion codes we want to fire (in a notepad or any kind of clipboard.
b) Tag manager – in this case, I will use a Google Tag Manager.
c) Website access and basic programming knowledge or a friendly developer who can implement the code for us.
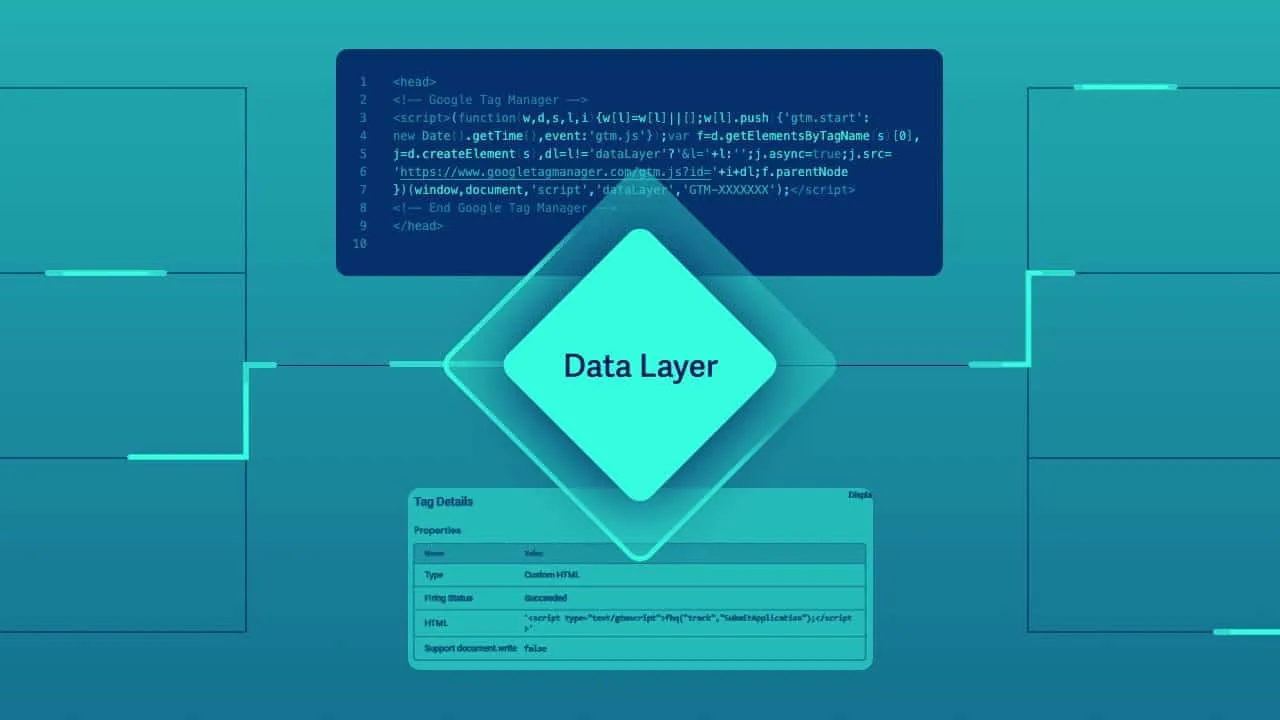
1. Add a data layer to the page
To set up the data layer you should add the following code to every page, like this:
<script>
  dataLayer = [];
</script>
It should be added above your tag manager code to make sure it will work properly. For example, if you want to store your customer ID code there it should be something like this:
<script>
  dataLayer = [{
    'userID': '1234567'
  }];
</script>
It can be empty, we will populate it with data in the next step when the desired action will happen.
2. Create the event code
The basic syntax for sending the event to the data layer is this:
dataLayer.push({'event': 'event_name'});I think it’s understandable even when to read in plain English. Push this event called “event_name” to my data layer.
In our case, we want to create an event called “signup” so let’s modify the snippet.
dataLayer.push({'event': 'signup'});3. Implement the code on the website
Now we want to fire the code when a user will fill the form. If we would like to track button clicks it could be something like this:
<a href="thank-you.html" onclick="dataLayer.push({'event': 'signup'});">
<meta charset="utf-8">  Sign Up Free
</a>
As you can see we’ve added our event code to the <a href> tag and we fire the code after the button is clicked. What if we want to track the form sent instead of the button?
It’s a little more complicated because there is no one forms standard and there are different tools, plugins, and form builders web developers can use.
Some forms are even auto-tracked by GTM variables which make things easier.
Sometimes there’s a thank-you page so we can use this page as a trigger.
Sometimes a form does not load a thank-you page but displays a thank-you message so we just have to make sure our tracking code is fired together with this message.
If you can’t find the place for the code on your own – don’t hesitate to ask developers for help or Google for solutions specific to your website and tools.
4. Create Google Tag Manager trigger
We have our event implemented so now we have to create a GTM trigger based on this code. To do that let’s go to Google Tag Manager container → Triggers → New.
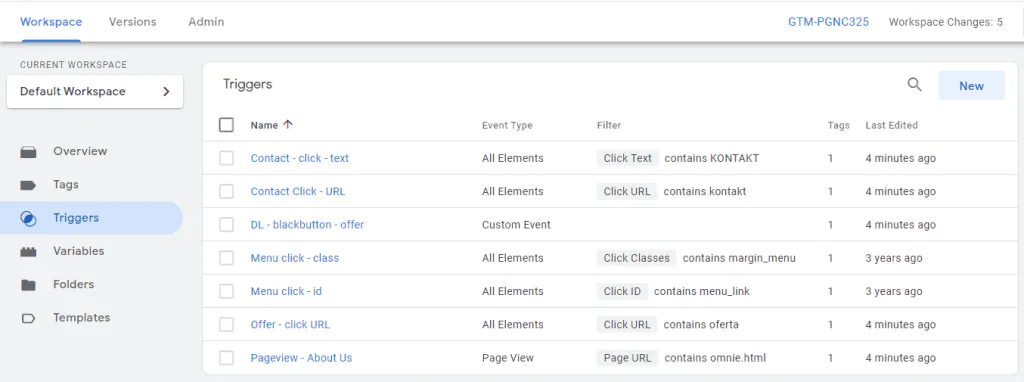
Name Your Trigger, open the configuration panel, and choose a “Custom Event”
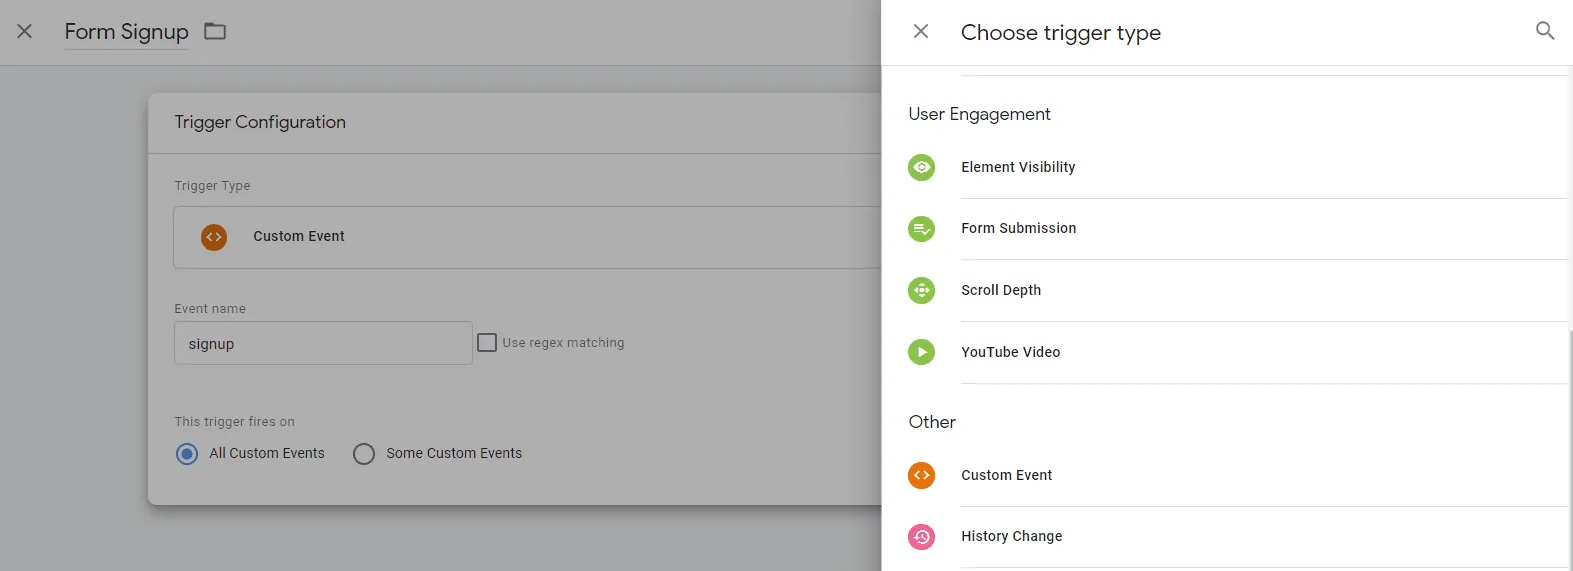
Type the event name you choose, in this case “signup” and save the trigger menu.

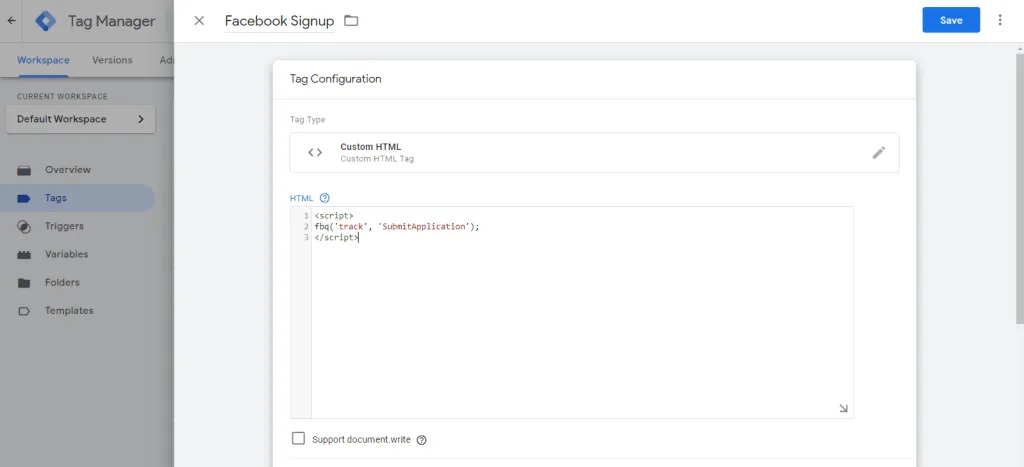
5. Implement Facebook Ads tag
Now that our trigger is ready we can implement our conversion code. All we have to do is to paste one of the standard event codes into the right place. Here’s the example code:
<script>
<meta charset="utf-8">  fbq('track', 'SubmitApplication');
</script>
Now, let’s get back to the Google Tag Manager, go to “Tags” section and click the “New” button to add a new tag.
Let’s name it “Facebook Signup” and paste our code in the tag configuration panel
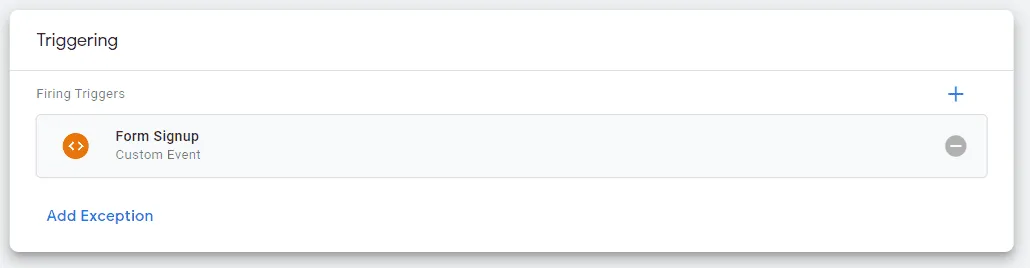
Last step will be to click on “Triggering” field and choose the “Form Signup” custom event we’ve created in the previous step.
Now we can save our changes and it’s done. But to be sure we have to do one more thing.
6. Verify implementation with Google Tag Assistant
Google Tag Manager offers you the possibility to test your changes before you publish it. When you are in the GTM click on the “Preview” button and you’ll see a Google Tag Assistant panel.
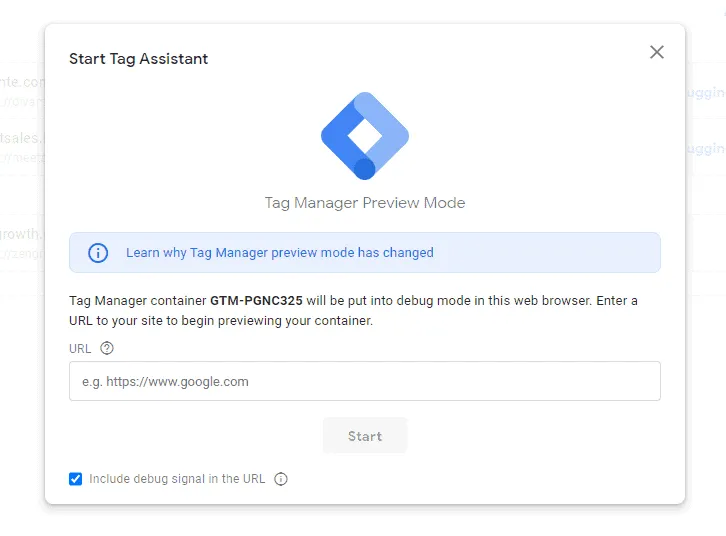
Type your website address and you’ll be able to do any action you want on the website and in the separate tab you’ll see the firing tags and data layer information. Click around to see what is changing and fill the form to see if the tag is fired properly. You should see something like that:
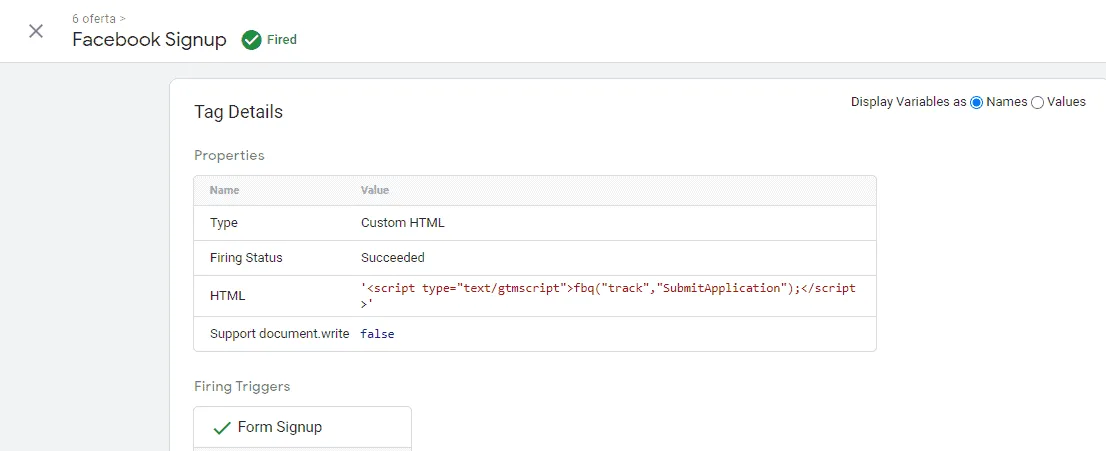
We can see the HTML code being fired and what trigger caused that.
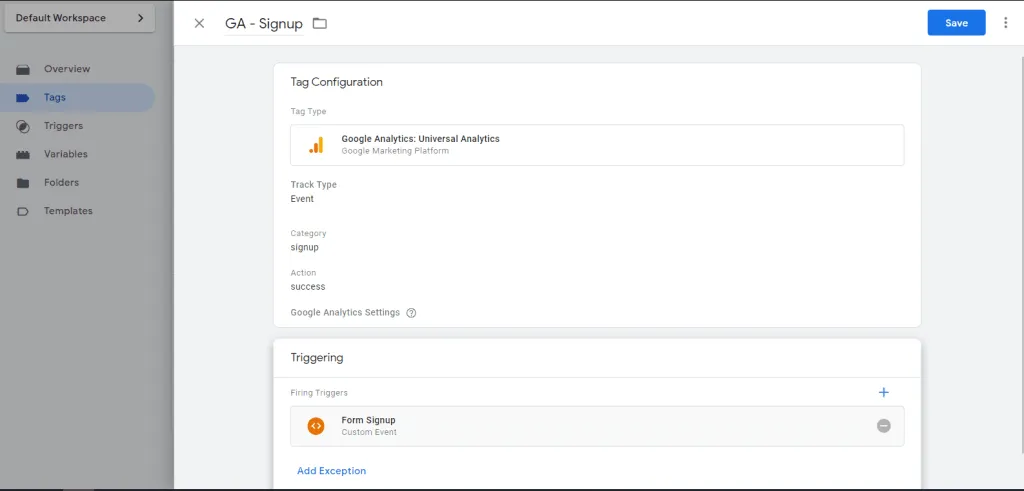
Our trigger is already on the website so to implement Google Analytics we can start from the step 5 of the previous instruction. All we have to do to make it work is to fire a different tag based on the same trigger and verify it. It will look like this.
Data Layer best practices
A few additional hints to make your workflow as smooth as possible:
Naming convention – Use a unique and understandable naming convention for triggers and tags. Events should be as descriptive as possible and for tags I suggest something like [platform]_[action] like “Facebook – Signup” or “GA – Signup” in our case. Keep in mind tags in GTM are by default sorted by name.
Create documentation – especially when your team contains more than one person it will be useful to write down what already is in the data layer and what the roadmap is. Duplicating codes may cause you a lot of trouble.
Plan the developers’ work – if you’ll need developer help with implementing codes or product info make sure your brief is specific and contains all of the information needed. Plan the implementations and send changes in batch so you won’t contact your webmaster every half an hour.
Consider website changes – when your website architecture is redesigned be there and make sure it won’t affect your data and any tracking codes. If you don’t have regular status calls / meetings with your IT department you may not even know about some changes so make sure you’ll have “your guy” who will remember about your analytics needs and let you know about changes.
If you’d like to go deeper into the data layer I can suggest reading official Google documentation. Here is the basic info and here’s the developer documentation with more use cases and details.
If you’d prefer to cooperate with a marketing analyst who will take care implementations for you – you can easily hire a perfect person via Hire Digital here.
I wish you high conversion rates and zero data errors.